Jane asked me today how to make a banner for Blogger. I figured that I would just post it on here in case anyone else wanted to know how to do this.
Now... I'm going to give specific directions on how to make a banner for the template that I use. Other templates in Blogger require the banners to be different sizes (and you can easily create the banner the same exact way, you just have to make sure the banner size is correct for that blog template). (I'm also wondering if techie Kim has any other quick tricks to make this process easier... feel free to share if you have a different way that is quicker!)
I use the Denim template. In Blogger, if you go to the "Layout" tab and then to "Pick New Template" it will be the second one over in the top row. I use the plain ol' "Denim" (not stretch denim etc)
The banner size for this template is 760px width. The height is adjustable, but I usually use a 350px height (give or take 50px, depending on how my pictures fit in there)
So... to make a banner.
First, open Photoshop (Elements, 6.0, CS2 etc...)
Go to >File >New
Type in these dimensions:
width: 760 pixels
height: 350 pixels
resolution: 300 pixels/inch
Click "OK" This will be the background of your banner.
From here you can change the background color:
-click the paint bucket
-and then the square in the front
-select your color of choice
-click the paintbucket onto your banner background
Now, if you plan to fill your banner with a picture, you don't need to do a background color.
To add a picture (or two or three):
1. Open the photo files you want.
2. Decide the width the photos will need to be (you know the height already: 350pixels). If you want to do two photos, divide 760 by 2. Three photos: divide 760 by 3 and yadda yadda yadda. for the banner that I currently have on my Oh. My. Words. blog I took my horizontal (larger/wider) photo and shrunk it to 350 pixels high like this:
>Click "Image"
>"Image Size"
>Under "Document Size" change the resolution to 300 pixels/inch
>Under "Pixel Dimensions" change the height to 350 pixels/inch
This will make the photo the same height as your banner.
- I then drag/drop the photo onto my banner. I still had a little "tall" strip of space left so I put in a vertical photo. I did the same thing, just changed the image height to 350pixels/inch. After this, you may need to move photos slightly to have them fit.
You could also easily do this: Say "Ok, I want one to be 400px wide by 350px height and the other will be 350px by 350px (leaving 10px space inbetween photos). Then just go to your crop tool and crop the photo to those dimensions.
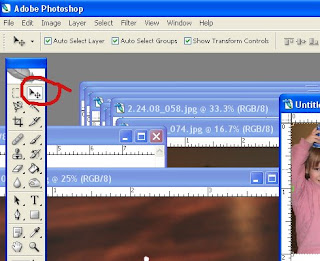
- Crop the pictures to the size you want. Select the crop tool (arrow pointing to it). Change the Width and Height to whatever you want the picture to be (in this, you'll put the number with px after it... such as width: 400px height: 350px). Make sure the resolution (circled) is the same as what you made the canvas. I just always use 300 pixels/inch.

- Select the area of the picture to crop. (hold curser on corner of pic, drag to select the area of the picture you want, and then hit enter)
- Then, drag/drop the photos onto your canvas
After you have your images in place, go to >Layer >Flatten Image
Now you can add text.
- Go to the little "T" in the tool bar (see the image above, where the red arrow is pointing to the crop tool? The "T" is all the way at the bottom to the right).
- At the top of the page you can select the font and size you want
- Click on the page where you want to put your text and type. You may need to adjust the size (select the text and then change the font size)
- You can then reposition the text by choosing the "Move" tool and then clicking on the text and dragging it to where you want it.
When you're done doing this, go to >Layer >Flatten Image. Save this to your files somewhere you'll remember to find it. (File>Save)
Now, to upload to Blogger...
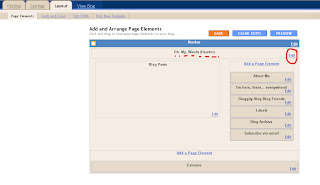
- Go to the "Layout" tab. 'Page Elements' should be the first screen.
- Click on "Edit" for the Header section.
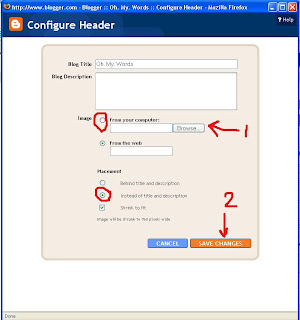
- A box pops up.
- Select Image: From your computer and then browse to add your image
- Select Placement: Instead of title and description
- Save changes
- Now up at the top go to "Fonts and Colors"
- Changing the hex code:
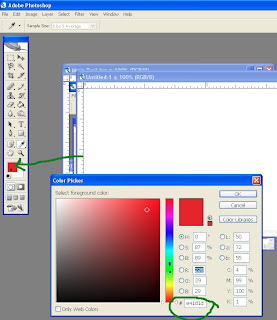
- Back in Photoshop, click on the colored box in the toolbar to the left
- A box pops up. You can slide the cursor along the rainbow bar and choose a color from the box. A hex code will show up (circled). This is the 6 digit code you'll put into the hex code box in Blogger under "Fonts and Colors"


28 comments:
Thanks Nicole! Hopefully I can get "with it" in the blog world and actually look like I know what I'm doing!
Thank you for this Nicole! I've always wondered how to do this & now you've showed me how. I still want to do some tweaking, but I made one for now. Thanks again!
Thanks a a lot !!! I want to put a new banner and I hope that I'' undestand yours explications because my english is very pooor !!! but yours explications seems very clear, simply !!! Thank again
Helena from Spain
Is is possible to make the banner as wide as the background?
Thanks so much-- have been wanting to do this and couldn't figure it out! It worked out great!
The information was very helpful, thank you.
http://babiesforlife.blogspot.com/
That was an excellent tutorial, been wanting to change my header for months and this was so easy!
great tutorial, however after i upload my photoshop file the error 'Your image is corrupt or is in an unrecognized format.' appears every time. any ideas why? thanks!
Kim, make sure that the file that you are uploading is NOT in .psd format, it has to be in .jpg format.
thank you!!!
Nice and informative blog. Keep up the good work.
regards,
www.itemplatez.com web design company.
thank you
thank you so much for this!
with your post i've finally done what i've been dreaming of for months!
much thanks again! :)
Just a quick tip...web images must never be a resolution of 300. Its unnecessarily high for web content. 300 is meant for print quality.
down size it to 72, since that is the size your computer screen displays it at any ways. It also loads quicker that 300.
Nice tutorial. There is more easy way of creating free Flash banners at bannerdroid.com
thank you so much for this! i was getting so frustrated and this helped a lot!
Thanks so much this has helped me SO much!! Please check out my blog as well, thanks so much!! :)
Thanks for the post.
thanks!
IS verry beautifull blogg with cool and best article....
if you want to watch online movies....
http://www.siberrygames.com/2012/09/watch-online-newest-pledge-2012.html
I love this valuable post same as the blogpost of VA custom banner design, better to keep on posting!
Nice post.
Thanks for sharing with us.
Roller Banners
I am so thankful to open this kind of site of yours because you really helped me so much to know how and what to do when there are things that will happen like this..because honestly i really don’t know what to do in terms of same topic .
THANXS FOR SHARING ! Decals | site signs
"Very good post...well i think writing this kind of article is a tough job.Thanks for your blog.
wall murals El Cajon
Hey, ….
I see your design, really nice I have a design company if you want to see please visit my web..
Image Masking Service
great blog very nice post
Website Designing in India
Thanks for the post and sharing the blog. Valuable and excellent post, as share good stuff with good ideas and concepts.
lots of great information and inspiration. I just would like to say thanks for your great efforts.
I appreciate your excellent post.
Clipping path service India
Post a Comment